
- Gadget - This is a vintage Gadget mod/tip. Ensure you verify all information.
- Chief - Additions and updates.
This is so simple and so important but so ignored. We spend a lot of time (and money) on things to make our motorcycles look better and go faster but rarely think about the little pads that make nearly a half ton of human, cargo and metal stop. So lets think about it now. You'll only need some basic tools and 45 minutes if you'll only be replacing pads.
On the other hand, if your brake fluid is looking a bit brown or it's been two years since you replaced it, maybe you should do that at the same time.
NOTE: On our Drifters, we have the brake cover to deal with but removal is self-evident... just be careful not to over torque it and break the tabs. Pads are the same for the 800 and 1500.
Pads:
Use the stock part number from Kawasaki and get the parts from your local Kawasaki dealer or an online source or save a few bucks and get EBC pads from pretty much any motorcycle store on the planet. The EBC part numbers are: Note, the "HH" designation at the end of the part numbers above is for the 'sintered metal' pad EBC strongly recommends for use on Vulcans. Sintered metal pads are what come as OEM equipment from Kawasaki and will last much longer and stop shorter than organic pads. The sintered pads also have better 'feel' than the less expensive organics. Also, you certainly don't have to use EBC pads, your dealer will be happy to sell you Kawasaki OEM pads (look up the part numbers on Kawasaki's website. |
|||||||||||||||||||||||||||
Tools: 12 mm socket or box wrench (for front caliper bolts) |
|||||||||||||||||||||||||||
Procedure: |
|||||||||||||||||||||||||||
 1. Loosen the caliper bolts (both sides of wheel for Nomad) With the bolts removed lift the caliper off the disk taking care not to support the full weight of the caliper by the hose. It might help if you un-clip the hose where it's attached to the fork at the reflector. |
|||||||||||||||||||||||||||
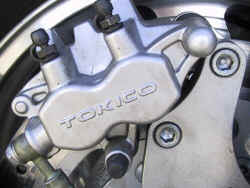
 2. Rotate the caliper so you're looking at the pads. Note a pin running across the bottom that's held in place by a pin. Remove the pin (see arrow in photo)and put it someplace safe. |
|||||||||||||||||||||||||||
3. Extract the bolt the pin held in place by turning and pulling. It isn't threaded. Put the bolt in a safe place |
|||||||||||||||||||||||||||
4. Swivel the inside pad upward and remove it from the pin it's attached to at the top of the caliper |
|||||||||||||||||||||||||||
 5. Pop out the outside pad noting the way it's held in place by spring clips. The spring clips 'shouldn't' pop off but if they do no problem, just slip them back where they were. |
|||||||||||||||||||||||||||
6. Using your brake parts cleaner, spritz the caliper and get the springs, pistons and the pins you set aside earlier nice and clean. They'll have brake dust and grunge all over them. Get everything as clean as you can then, using your thumb(s) or one of the old pads set against the pistons press the piston(s) back into the caliper. Caution Do not have the cap off of your master cylinder reservoir when you push the pistons back in. Brake fluid will squirt, with some force, out of the master cylinder and could land on painted parts. This would be bad, very bad as brake fluid is one of the better paint removers ever created by man. |
|||||||||||||||||||||||||||
7. With the caliper clean and pistons pressed back into place get out that tube of brake grease (yes, I know there should be a less threatening name). Use the grease on the pins and channels the pads slide in. You won't need a lot. |
|||||||||||||||||||||||||||
8. This is actually optional. Apply anti-squeal goop to the back of each pad as instructed on the package. Allow the goop to try (it'll semi harden into a sort of gel). |
|||||||||||||||||||||||||||
9. Put your new pads into the caliper exactly the same way the old one's came out. Piston side pad first, snap it into the springs then the other side sliding it over the lubricated top pin and swiveling it down into place. Put the small bolt back in place and secure it with the pin. |
|||||||||||||||||||||||||||
8. Using a piece of Emory paper (sandpaper would probably work) sand the brake disk to break the glaze formed by the original pads. You don't have to sand a lot, just a couple of times around the disk inside and outside. |
|||||||||||||||||||||||||||
9. Slip the caliper back into place and tighten the bolts to 25 foot pounds. The torque is important to prevent the caliper from vibrating and possibly causing a buzzing sound when brakes are applied. |
|||||||||||||||||||||||||||
10. Check brake fluid level to be sure it isn't higher than it's supposed to be. There's a level marker on the outside of the master cylinder next to the level window. If fluid is near the top siphon some off to prevent overflowing when you do the other side. |
|||||||||||||||||||||||||||
11 On Nomad do the other side the same way. |
|||||||||||||||||||||||||||
 12. If you're doing the rear it is done exactly the same as the fronts except rather than hex bolts you have 8 mm Allen head bolts holding the caliper in place. Loosen and remove these bolts, lift the caliper off the disk and change pads exactly the same as above. When finished tighten the Allen bolts to 25 foot lbs. |
|||||||||||||||||||||||||||
13. When finished tightening bolts, exercise the brake lever/pedal to press your new pads back against the disk. Check fluid level to be sure it's at the full mark. |
|||||||||||||||||||||||||||
14. Ride easy at first, breaking in your new pads slowly for the first 100 miles or so. Hard use will
cause them to glaze quickly and they won't form themselves to the little grooves and valleys you probably have
in the disks. |
|||||||||||||||||||||||||||
There are probably dozens of ways to bleed brakes, you may have your favorite ranging from the use of "speed bleeders" (replacements for the stock bleed valves), using any handy person to open and close the bleed valves as you pump the brake lever/pedal, using a 'one man bleeder' which is essentially a hose with a one way valve in it. One side of the hose is dropped in a glass of brake fluid, the bleeder valve is opened and you pump the lever/pedal while pouring clean brake fluid into the reservoir. Here are a couple of better methods (a lot less work)
1. Use a pump type oil can (very clean) filled with brake fluid. Attach a hose between the oil can and the brake bleeder valve, open the valve then begin pumping your oil can. You will be pumping nice fresh brake fluid 'up' through the system and into the reservoir, displacing the old fluid and any air in the system as you go. It will help to have an assistant at the reservoir end removing the old fluid. A large syringe will come in handy for this. Do Not Spill Brake Fluid On Your Paint! If you do, rinse immediately with water.
2. Another fast easy method is the use of a "MityVac". This is a hand held vacuum pump with a canister attached that collects the old brake fluid. Attach the Mity Vac to the bleeder valve, pump the Vac a few times then open the bleeder. Old fluid will be drawn out of the system while new is being poured into the reservoir. One big plus of using the Mity Vac is the ability to draw 'all' the old fluid out and then begin replacing it with entirely fresh fluid. Air is drawn out of the system while new fluid is poured into the reservoir. Once you've started adding the 'new' fluid don't let the reservoir go dry or you'll have to start over again.
3. Dual piston calipers have two bleeder valves. You can do the bulk of your fluid change using just one valve then open the other at the end just to exhaust any old fluid trapped there along with air.
4 Exercise your brake lever/pedal to be sure you have all the air out and both work the way you expect them to. Oftentimes they seem to feel a little 'squishy' until used a few times.
5. Go ride
Cheers
Gadget
|
Web site design by Saftek. Copyright © , Saftek Inc. Duplication of any element of this
Not affiliated with Kawasaki. Kawasaki, Vulcan and Drifter are trademarks of Kawasaki. |
